Pages

Sunday, December 18, 2011

Fancy Gift Bag

Hey everybody!  I want to show you an easy way to dress up a plain old brown paper lunch bag and make it into a gift bag!  I have made these before but for this one, I added in a Lil' Stem ruffle along with some Lil' Bloom embellishments from Punky Sprouts.


Here is what you need:
*Paper Lunch Bag
*2 Pieces of Patterned Paper
*Glue
*Lil'Stem
*Lil' Blossoms
*Small Square of Velcro

1. Cut the top off your bag so that it is 6" tall. Mine is 5" wide...check yours and adjust the measurements I give here!


2. Cut the pp you want for the front of your bag to 5" (width) x 6".
Cut your other pp to 5" (width) x 8.5". This will be the back and front flap of the bag.
Cut a 5' (width) x 2.5" piece for under the front flap to hide the pleats.

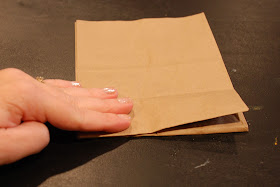
3. Now you are going to fold the bottom flap of the lunch bag down. Like this:


4. Glue the front onto your bag...this goes on the side without the flap. You want to line up the bottom edge with the bottom edge of the bag...you can always trim at the top if you need to.


5. Grab your piece of pp that is the back and score (or fold) it at 6".


6.Take your Lil' Stem and pleat it.  I glue mine as I go to hold it all in place.  This doesn't have to be perfect (as you can see!).


7. Glue this pleated strip to the underside of the flap...this is the piece that you scored.


8. Now glue the 2.5" piece to sandwich the canvas in between the 2 pieces of paper.

9. Glue the back on. Line up the scored flap with the top of the bag. There WILL be a lip at the bottom...you want that! It will make your bag stand straight when we're done. 


9. Add a piece of velcro on the flap to hold it down. Your bag is finished unless you want to add some decorations!  I added a few different sizes of Lil' Blooms.  I chose to leave all my canvas natural but you could also mist them for some color!


 Here are a couple shots of the finished bag:


Saturday, November 26, 2011

School Portait Solution

This is my newest Punky Sprout album using the new Teenie Beanie Sprout.  I used the blue and pink Authentique lines to do a book for my kids' school portraits.  I never knew what to do with them...as a stay-at-home-mom, it seems they are always with me, so I don't even keep a copy in my wallet! :)  We have the current year's picture on the wall but this way we can look back and see them grow!  I decided to do it by grade instead of year...so that I could see what each kid looked like at the same age.

I wanted to keep this super simple because I know the kids will want to flip through it a lot and I just felt that I wanted the focus to be the portraits.  Since the paper is pretty busy, I kept the embellishments to just the numbers and a little punched strip.  The numbers for each grade are from Bella Blvd and are white.  I used my Copic Markers to color them.  On each one, I used 3 different shades and blended them together.  This was my first time using Copics and I have to say that I now know why so many people are addicted! :)


 The Lil' Petal banner pieces are some of my favorite Punky embellishments but they were much too large for me to spell out school on the cover of this little album.  I learned this little trick from Punky owner Shelly!

Take the bottom tip of the triangle and fold it up to the top.

Cut along each side of the folded up triangle.

Then cut the remaining diamond in half.

You just made one banner piece into 4 mini banners!

Saturday, November 19, 2011

Watch it Wiggle...Rainbow!

While I thought that everyone knew how to layer jello...I actually got a lot of questions about this so I am going to show you how I did it!  It is really easy but is time consuming since everything has to chill!

I used 6 different jellos for mine.  You could probably do the small boxes but my store didn't have all the colors I wanted in that size.  I ended up pouring a lot of jello down the sink though.

Make your jello according to the quick set directions on the box.  This involves putting ice into it to do a quick chill.  Pour the first color into your bowl.  I used a trifle bowl but you could use whatever...including individual cups.  Put the bowl in the refrigerator and chill for about an hour.  Then make the next color and repeat.  Repeat.  Repeat.  Until your bowl is filled or you have all the colors you want!

Before serving you probably want to chill over night.

 This was a huge favorite at the party!

Friday, November 18, 2011

Rainbow Mobile

This is without a doubt, my new favorite party decoration!  It was easy, cheap and made a big impact!  I told Tadd that we may see these for every party we ever have! :)  While these are rainbow to go with Erin's rainbow party, you could easily use any color!  How about a maroon and gold one for a Harry Potter party (Gryffindor colors)?  Or lots of shades of pink for a princess party?  Red and green for Christmas?  I could go on and on!

Here's just a little tutorial in case you want to make your own!  I found these on Pinterest and here is the tutorial I used! :)


 First gather your paper.  I used cardstock.  I cut mine into 1" x 8" strips.  I found it easiest to have them laid out in piles when I was putting them together.  I used 8 strips of paper for my shortest mobile and 30 for my longest.  Just depends on how low you want them to hang.

Now, we sew!  As my friends can tell you, my sewing projects don't always go exactly as planned.  This, however, was a piece of cake! :)  I didn't measure or worry about being perfect at all!  I eyeballed the center of the strip and sewed a line down it.  Once I hit the end of the strip, I just pushed it through, about to the point my silver plate ended.  (like how exact that is?)  It really doesn't matter.  Then start the next strip.  ***DON'T FORGET to leave about 12" of thread at the start for hanging it up!

Here's a close up.  You can see that the gaps in between the strips aren't all the same width...but I can tell you, no one but you will notice! :)

All of them hanging up.  I really liked all the different lengths.   The tutorial I had used said to put a fishing weight on the bottom to keep them from curling up.  I did not do this and had no curling.  I think this was because I used cardstock and she had used vellum.  If you use something thin, you may need to do it!

And my favorite shot...looking up from underneath it!
If you make one...please link it up!  I'd love to see it!  Tomorrow...a rainbow jello tutorial!

Thursday, November 17, 2011

Week 2 of Pictures!

Here are my week 2 pictures from the Picture a Day challenge I am doing for November.  I am having so much fun doing these!  I am missing day 14 because, although I know it is supposed to be taken that day, I knew what I wanted to take a picture of and didn't have any here at home.  I'll post it with next week's! :)


Wednesday, November 16, 2011

Rainbowlicious!

This last weekend was Erin's 5th bday party!  She decided on rainbows as her theme this year!  I was beyond thrilled!  As a girl of the 80's who grew up collecting rainbow stickers, wearing rainbow shoelaces and sleeping under rainbow wallpaper, this was right up my alley!  I found tons of ideas on Pinterest!  If you don't know what that is...it is just the best site ever invented! :)

Here are some of the pictures from the party.  I took pictures and will have tutorials on a couple of the things in the next couple days!

The party table.

Rainbow Cupcakes

Rainbow Jello.

 Fruit Rainbow complete with a pot of gold!

Her first Barbie.

A Hermione Wand!

 Officially 5!

All the cousins!

Monday, November 14, 2011

Sweet and Spooky

Hi everybody!  I hope you are enjoying your fall season and getting lots of crafting in!

I had planned on using the Phantom paper from Pink Paislee on a non-Halloween layout because it is so versatile!  But as I sat down to work on it...I just loved all the embellishments that are definitely Halloween!  I hardly ever stamp on my layouts (I think this is due to laziness!) but I stamped with 4 different stamps on this!  The set of Halloween stamps from Pink Paislee has some really fun ones!

I used the Punky Sprouts new lil blossoms on this as well.  I sprayed them with Glimmer Mist...they are a little waxy and don't take the mist great but since I wanted this to have a grungy feel, it worked perfectly!  I sprayed 2 with Peach Delight and 2 with Granite.  While they were still wet, I dabbed off the excess mist and layered them, alternating colors.  Then I put one of the Pink Paislee brads through the center and scrunched the layers until I was happy with how it looked.


Wednesday, November 9, 2011

I'm Back!

I didn't mean to be gone for quite so long!  This fall with soccer and cross country, the blog just sort of got pushed to the back burner!  We did have one "exciting" event...Isaac (8) fell off his bike and had 6 stitches on his chin as well as a broken jaw!  He has been on a liquid only diet for almost 4 weeks now!  We go back to the doctor on Friday and hopefully he can start eating!

I started another 30 day picture challenge for November.  I tried this back in September but I should have known better! :)  This one is going much better!  Here is my first week of pictures.