I got to work with the Sugar Kit this month and it is gorgeous! This Twig line by Little Yellow Bicycle has great patterns! You can see the kits here!
Tuesday, March 15, 2011
Saturday, March 12, 2011
Speaking of Jillibean Soup...
they are having a design team call and I am throwing my hat in the ring! This is the first manufacturer call that I have really gone all out...making new projects for it! Usually I see it at the last minute and just use what I have. But since Jillibean is a favorite and I follow their blog and on Facebook, I caught the call early! I wanted to show some of the older Jillibean Soup layouts and projects I have done as well! I'll show my new layouts when the call is over!
Another Punky Sprouts album. You can see the whole thing on the Punky blog!
A card I made for the design team call...it was one of 3 I made and they only wanted 2...this one got cut! Although I still like it! :)
My first layout about a TV show! This was right after Lost ended and we had done a little party and I made a bunch of "Dharma Initiative" food as decorations!
A double page spread. This is one of my favorite layouts for the story of it! This is Isaac with Patty, our Camp Sherman cook! He's a pretty smart kid but she has had him convinced...for the last 2 years!!!...that the seads he is mixing with water and putting by the fire really do cook into bread! The resulting bread looks an awful lot like leftover hot dog buns, muffins and bagels! :)
A Christmas card made with not Christmas paper! I love doing that! And it also has Glimmer Mist...one of my favorite things to do!
A super simple layout of some not great photos of Erin who had to get up on the table to clean because she couldn't reach the middle! I know it's not a perfect layout or pictures but the story is precious!
One of my favorite things to make with scraps...mini cards! I love tucking them into gifts or Isaac's lunchbox!
Punky Sprouts and Jillibean Soup!
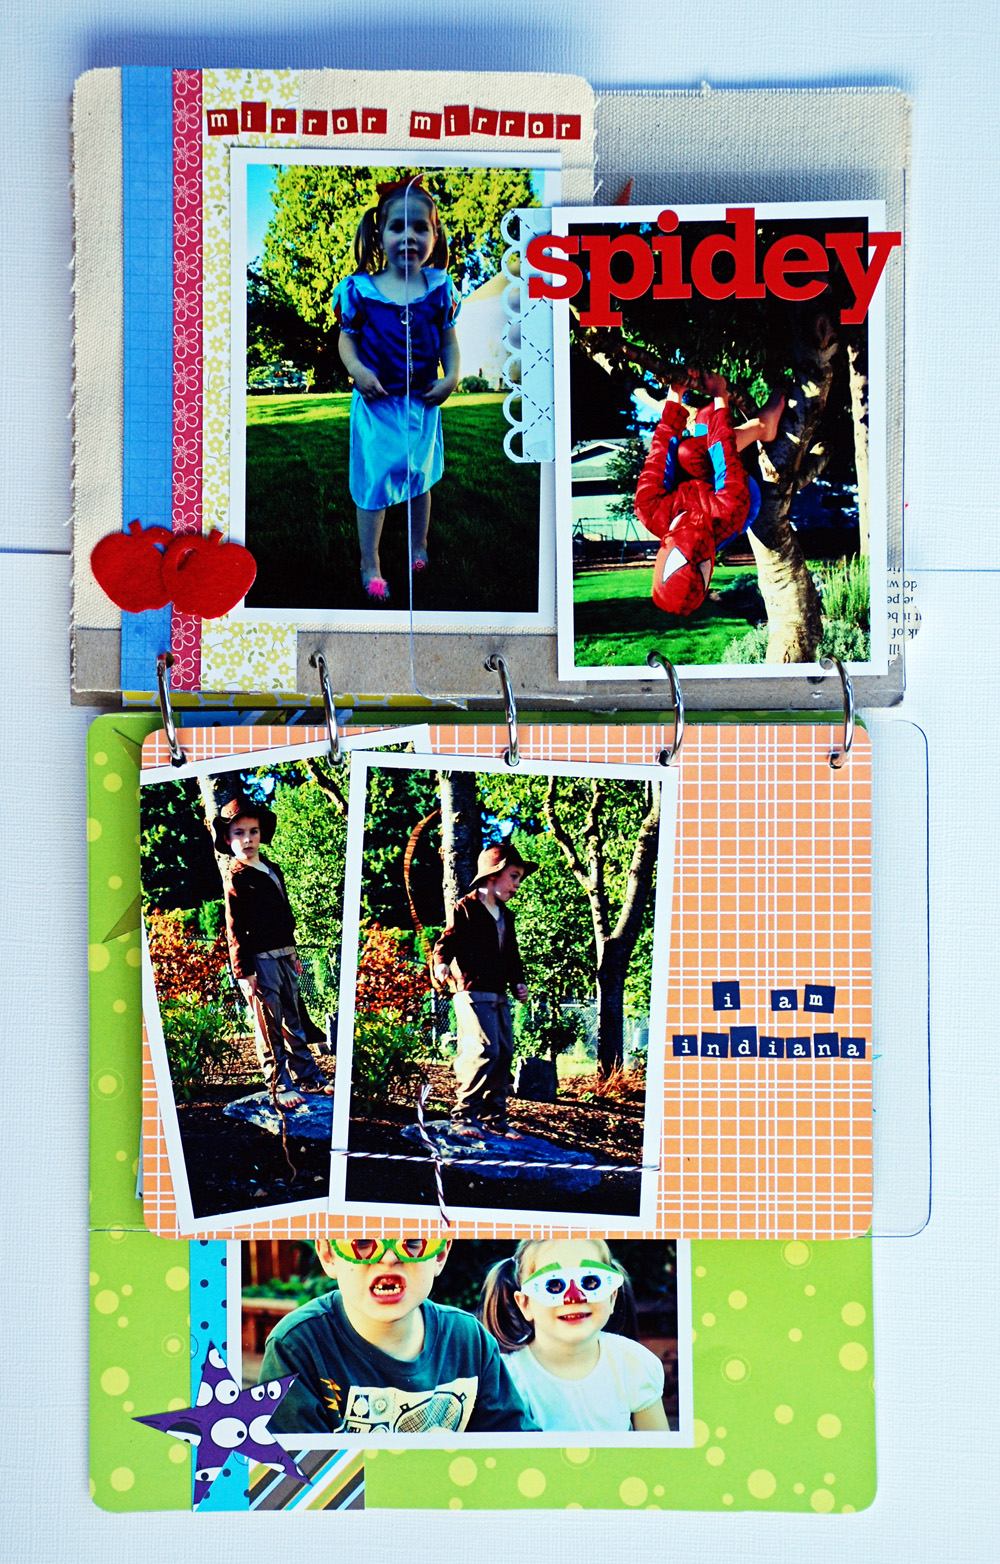
I am so happy with how this Rebel Sprout album turned out. It is one of my favorite albums I've done. I took these pictures of the kids last fall when I was passing some of Isaac's costumes to a little cousin. He was starting to out grow them physically and just wasn't as interested any more. But, luckily, I realized before handing them off, that I didn't have many pictures of him in them! So, we took the dress up box out on the deck and had ourselves a super fun photo shoot! Some of Erin's photos are a bit dark...she doesn't like the sun in her eyes...but I think they turned out cute anyway! I did a fun "action" on the photos in Photoshop to give it a comic bookish feel! Would love to know what you think!
Wednesday, March 9, 2011
More Good News!
I am feeling so blessed this last week and a half...especially on the scrapbooking front! :) Today I had 2 happy emails! One was from Scrapbook News and Review requesting one of my layouts. And the other was requesting a mini album for the publication Create: Mini Albums. I have been on cloud 9 all day!
Since my last post was text only I am adding in a layout that I haven't shown before! This was the challenge Audra and I hosted for the Crowned challenge at Scrapdango. We had Swimsuit week so the layout had to have Yellow, Polka Dots and reveal something about you.
My mom loved it! :)
Since my last post was text only I am adding in a layout that I haven't shown before! This was the challenge Audra and I hosted for the Crowned challenge at Scrapdango. We had Swimsuit week so the layout had to have Yellow, Polka Dots and reveal something about you.
My mom loved it! :)
Friday, March 4, 2011
Old Good News and New Good News!
First the New good news...one of my cards was picked up for a special issue of Paper Crafts Magazine! It is the Go-To Sketches issue that will be out in August! I love sketches! This was my very first time submitting to them and I got 2 done in time and they liked one of them! I was thrilled to be watching them announce on Facebook that the emails were going out and then actually get one! :) There were 2,750 submissions and only 288 cards were chosen. 134 designers are in the book and only 38 of us are "newbies"!
Now for the Old good news! I had forgotten to post this earlier! I had a card in the January Issue of Cards. It was my 2nd time being in that magazine. Since the month is well over, I can share that one!
Friday, February 11, 2011
Easy Valentine Gift Bag and Flower Tutorial
I did this tutorial for the February Scrapdango Newsletter and thought I'd share here too! Let me know if anything doesn't make sense and if you make one I'd love to see it...link it up! I'm linking to 30 Days' Pity Party for the first time today!
Supplies:
*Paper lunch bag
*Patterned paper (1 or 2)
*12" ribbon
*Pages from a book
*Scalloped circle punch (mine is about 2")
*Velcro
*Mist
1. Cut the top off your bag so that it is 6" tall. Mine is 5" wide...check yours and adjust the measurements I give here!
2. Cut the pp you want for the front of your bag to 5" (width) x 6".
Cut your other pp to 5" (width) x 8.5". This will be the back and front flap of the bag.
3. Now you are going to fold the bottom flap of the lunch bag down. Like this:

4. Glue the front onto your bag...this goes on the side without the flap. You want to line up the bottom edge with the bottom edge of the bag...you can always trim at the top if you need to.

5. Grab your piece of pp that is the back and score (or fold) it at 6". Then punch 2 little holes on that score line.

6. Feed your ribbon through these holes, tying knots on the inside to keep them in place.
7. If you have a border punch, now is the time to punch the top flap.

8. Glue the back on. Line up the scored flap with the top of the bag. There WILL be a lip at the bottom...you want that! It will make your bag stand straight when we're done. You can tuck the ribbon under the pp if you want.

9. Add a piece of velcro on the flap to hold it down. Your bag is finished unless you want to add some decorations!

Let's make a flower to embellish the bag!
1. Punch out 6 scalloped circles...non-scalloped work too. So do hand-cut circles that aren't perfect! My circles are about 2" across.

2. Spray all of the circles with the mist...you want them pretty covered and wet! I have found that Glimmer Mist works better than the Smooch for this. The Smooch dries a little to fast but it will work. If it dries too fast, you can just mist with some water! The Smooch does give a richer color too! I used Smooch here. (from the Spice kit!)

3. Now, stack them all up (yes, they're wet and yes, you're going to get messy!) and attach with a brad. I usually just poke it through without punching a hole.

4. Scrunch up each circle, one by one, like this:

Until it looks like this:

5. Now just sort of fluff out the circles until you are happy with how it looks.

6. Cut some leaves (I used a coffee sleeve) and mist if desired.

7. Attach your leaves and flower to the bag flap! And there you have a wonderful treat bag...perfect for Valentine's Day treats!
Supplies:
*Paper lunch bag
*Patterned paper (1 or 2)
*12" ribbon
*Pages from a book
*Scalloped circle punch (mine is about 2")
*Velcro
*Mist
1. Cut the top off your bag so that it is 6" tall. Mine is 5" wide...check yours and adjust the measurements I give here!
2. Cut the pp you want for the front of your bag to 5" (width) x 6".
Cut your other pp to 5" (width) x 8.5". This will be the back and front flap of the bag.
3. Now you are going to fold the bottom flap of the lunch bag down. Like this:
4. Glue the front onto your bag...this goes on the side without the flap. You want to line up the bottom edge with the bottom edge of the bag...you can always trim at the top if you need to.
5. Grab your piece of pp that is the back and score (or fold) it at 6". Then punch 2 little holes on that score line.
6. Feed your ribbon through these holes, tying knots on the inside to keep them in place.
7. If you have a border punch, now is the time to punch the top flap.
8. Glue the back on. Line up the scored flap with the top of the bag. There WILL be a lip at the bottom...you want that! It will make your bag stand straight when we're done. You can tuck the ribbon under the pp if you want.
9. Add a piece of velcro on the flap to hold it down. Your bag is finished unless you want to add some decorations!
Let's make a flower to embellish the bag!
1. Punch out 6 scalloped circles...non-scalloped work too. So do hand-cut circles that aren't perfect! My circles are about 2" across.
2. Spray all of the circles with the mist...you want them pretty covered and wet! I have found that Glimmer Mist works better than the Smooch for this. The Smooch dries a little to fast but it will work. If it dries too fast, you can just mist with some water! The Smooch does give a richer color too! I used Smooch here. (from the Spice kit!)
3. Now, stack them all up (yes, they're wet and yes, you're going to get messy!) and attach with a brad. I usually just poke it through without punching a hole.
4. Scrunch up each circle, one by one, like this:
Until it looks like this:
5. Now just sort of fluff out the circles until you are happy with how it looks.
6. Cut some leaves (I used a coffee sleeve) and mist if desired.
7. Attach your leaves and flower to the bag flap! And there you have a wonderful treat bag...perfect for Valentine's Day treats!
Wednesday, January 26, 2011
Subscribe to:
Posts (Atom)